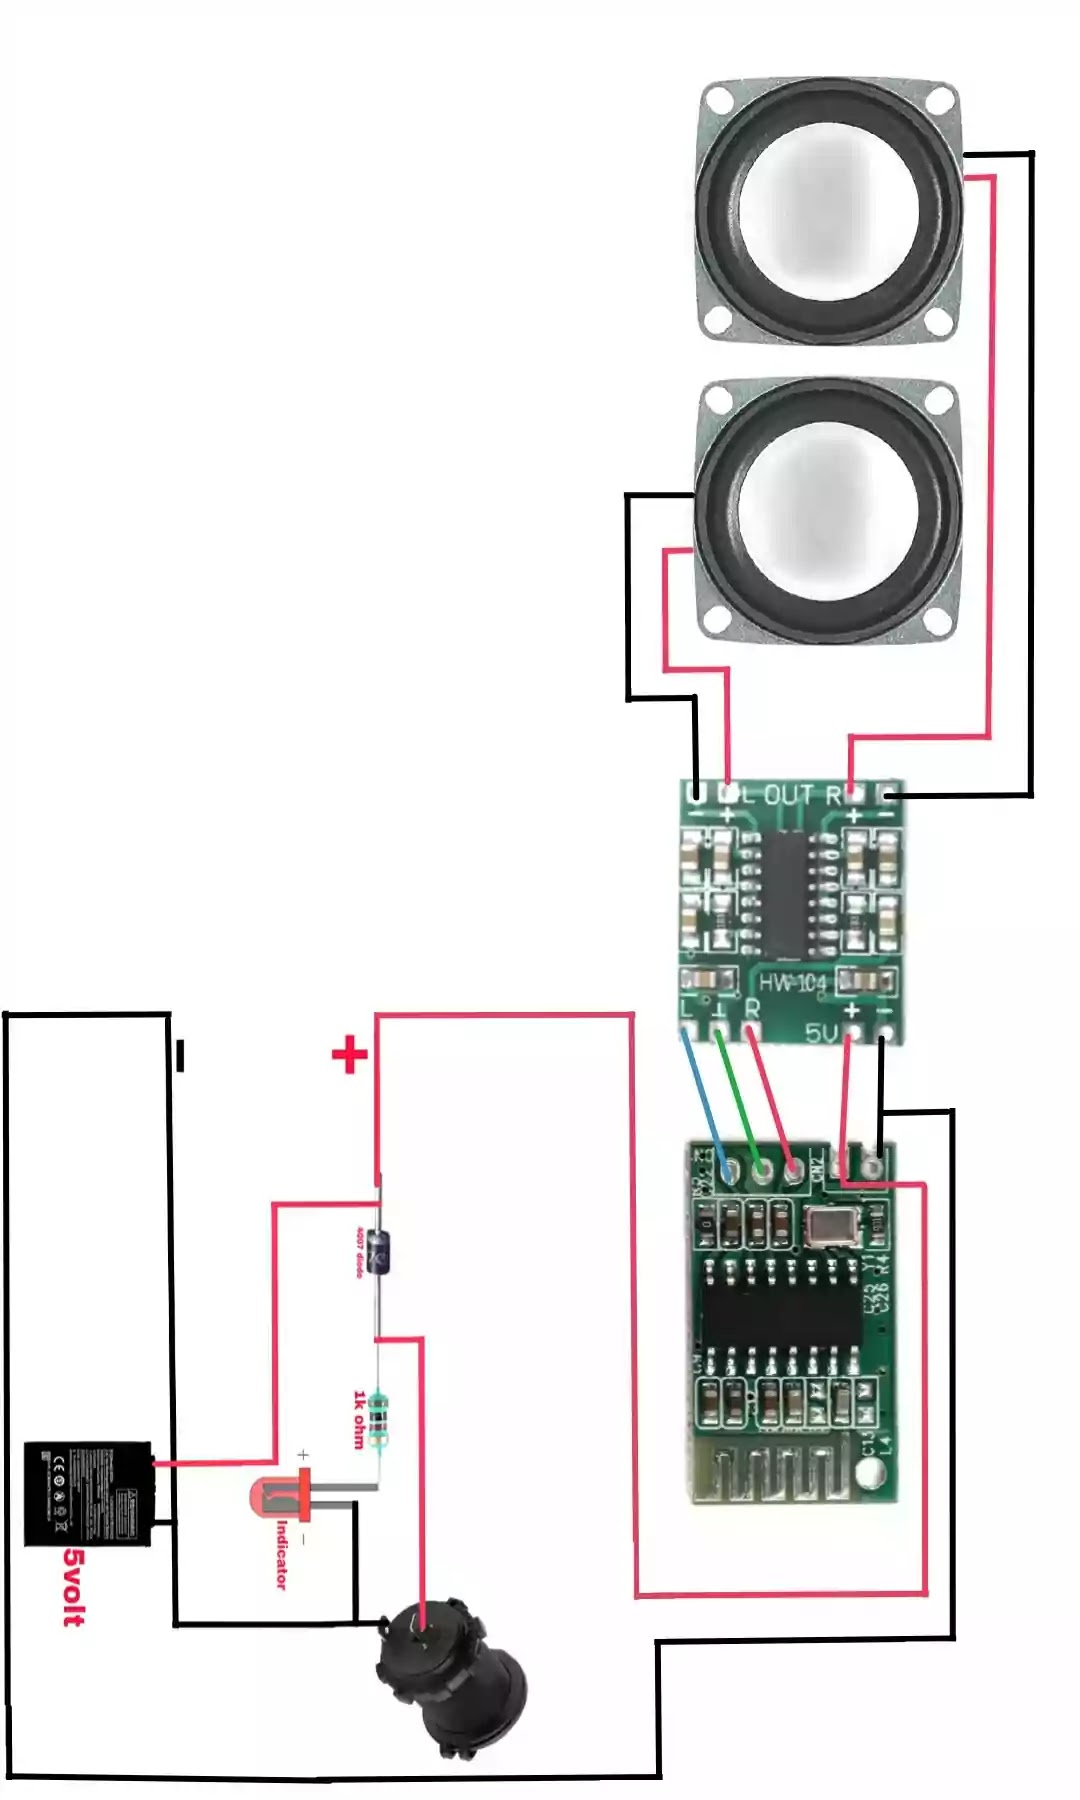
अगर आप mini amplifier बनाना चाहते है तो आप सही जगहा आये है हम आपको बहुत से ऐसे तरीके बताएंगे जिन से आप आपको बहुत मदद मिल जाएगी अच्छा और छोटा apmlifier बनाने मे हो सकता है कुछ लोगो को पता हो इस बारे मे पर उन को ये नहीं आता होगा की आज जो हम बताने जा रहे है उन को कभी पता ही नहीं होगा इस लिए देखे आज हम जिस kit के बारे मे बता रहे है ये आपको ऑनलाइन और ऑफलाइन दोनों तरहा से मिल जाती है हो सकता है की किसी किसी शहर मे ना मिले तो आप ऑनलाइन ले सकते है आपको यहां पर तीन सामन को लेना होगा जब आपका amplifier बनेगा और जो सामन आपको लेना है उन का ना हम आपको बता रहे है साथ मे आपको अच्छे से समझ मे आ जाये इस लिए आपको डायग्राम भी बना कर दे रहे है जिस से आपको और ज्यादा अच्छे से समझ मे आ जायेगा की आपको amplifier कैसे बनाना है
•8403 IC kit
•Bluetooth
• charging circuit
• battery
• 8403
इस से आप दो स्पीकर को चला सकते है और बहुत ही आराम से और ये मिनी kit जो स्पीकर चलती है वो 3watt के होने चाहिए और सब से अच्छी बात तो ये है की इस amplifier को आप 5 volt पर चला सकते है जो आपके लिए बहुत अच्छी बात है इस 8403 इच्छा kit कि ये बात मुझे सब से अच्छी लगती ही है की इस मे आपको Bluetooh से भी चला सकते है और अगर आपको Bluetooh से नहीं चलना है या आपके पास Bluetooh नहीं है तो आप इस मे aox भी laga सकते है उसका भी आपको डायग्राम बना के दे देंगे आप बना लेना
• How to make IR sensor at home Click here
• Light emitting diode Click here
• TDA7297 full details in hindi Click here
• Bluetooh
आपको bluetooh भी लाना पड़ेगा और अगर आपके पास पहले से ही है bluetooh तो आप ना ले ता अच्छा है और अगर नहीं है तो आपको लेना होगा वैसे आप इस मे aox भी लगा सकते है ये आपके ऊपर है इस मे आप वह bluetooh भी यूज़ कर सकतते है जो आप रोजाना यूज़ करते है
•Charging circuit
charging circuit कोई बनाना बहुत ही आसान है
charging circuit को बनाने मे जो सामन चाहिए होता है वो सब आपको बहुत ही आसानी से मिल जाता है इस लिए आपको ज्यादा परेशानी नहीं होती है इस charging circuit कोई बनाने मे जो सामन चाहिए होता है वो मे आपको बता देता हु और आपको डायग्राम बना के दे दिया है जिस से आपको समझने मे और ज्यादा आसनी होती है इस पुरे mini amplifier को बनाने मे आपको कोई भी परेशानी होती है तो आप मुझे पूछ सकते है
सामन
• 4007 diode
•R- 1k
•Red led
•Charging jack
• battery
बैटरी के बिना तो कुछ भी नहीं है उस लिए आपको सबसे पहले एक बैटरी लेनी होंगी हा आप बैटरी कोई भी ले सकते है जैसे की मोबाइल की बैटरी या आप मार्किट से भी ले सकते है वैसे आपको बता दू की मैं वीडियो भी बना दिया है एक मिनी amplifier के ऊपर आप देख सकते है या आपको 100 watt को amplifier बनाना है तो इस का भी वीडियो मैने बना दिया है
Maybe you like
•Circuit diagram TPA3110 Click here
•4440 ic board circuit diagram Click here
•fairy light Click here
•Best Earphone under 500 Click here
•TF card MP3 Decoder Click here
•How to make 5mm led Chaser Click here
•Power bank for mobile Click here
•Mini bluetooh full details Click here
•TPA3110 amplifier kit board full details Click here
•8mm led Chaser connection Click here
•How to make mini amplifier Click here
•How to make IR sensor Click here
•How to make mini amplifier Click here
•Light emitting diode Click here
•What is 4440 ic Click here
•TDA7297 full details Click here
•Electronic TP 4056Click here
• ir sensor use 547 transtor Click here
•LED Remote control application Click here
•5 volt battery charger Click here
• amplifier use Onida speaker Click here
•7805 ic kaam kese krta hai Click here
•6383 ic se kitne watt Tak ke speaker Click here
•Multiple battery chargers Click here
•sunflower RGB led light circuit diagram Click here
•LED jhalar circuit diagram Click here
•12 Volt battery charger circuit diagram Click here
•Bridge rectifier AC line DC line connection Click here
•amazing idea Click here
•RGB light circuit diagram Click here
•JBL earphones repair Click here
•IR sensor Click here
•RGB light circuit diagram Click here
•how to solve Vivo lead left right problem Click here
• multiple USB charging port hub with OTG Click here
• Led multicolour Click here
•how to make OTG connection Click here
• emergency light circuit diagram Click here
•how to repair emergency light Click here
•12 volt power supply Click here
•6283 IC full circuit diagram Click here

Comments
Post a Comment